You're using these instructions and software at your own risk entirely. I am in no way whatsoever liable for whatever damage you might cause to your equipment including but not limited to PMC-10, Personal Computer, Laptop, soldering iron, cables, connectors, life, etc. .
You recently snatched a Digitech PMC 10 Programmable MIDI Controller off eBay.
It came without the programmer. Bummer.
But don't despair: a solution is right around the corner!
You need to connect it as follows:
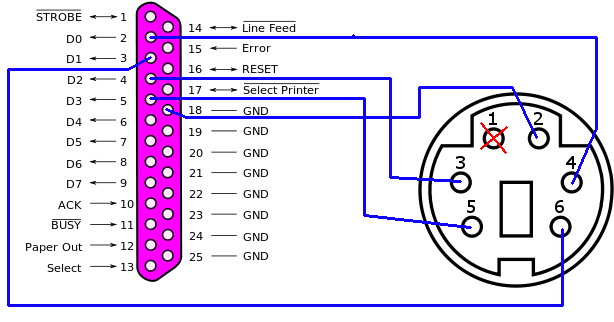
The images below refer to the 5-pin male DIN connector, with the central orientation tab at the bottom and the pins facing you. The colors red, yellow, black, orange, green refer to Radio Shack 6-pin Mini-DIN PS/2 keyboard extender cable (26-149A). The colors red, brown, orange, green, black refer to Australian Jay Car variant of the keyboard extender cable. Beware that your cable may be using different colors, in which case you'd need to figure out the pin assignment using a continuity tester. Pin 1 needs to be broken off for the connector to fit into the PMC 10's "PROGRAM REMOTE" socket.
| DIN pin | RADIO SHACK color | JAYCAR color | PIN ON PAR.PORT |
| will be broken off | - | - | |
| Pin 2 | black | orange | 18 GND |
| Pin 3 | orange | green | 4 D2 |
| Pin 4 | red | red | 2 D0 |
| Pin 5 | green | black | 5 D3 |
| Pin 6 | yellow | brown | 3 D1 |
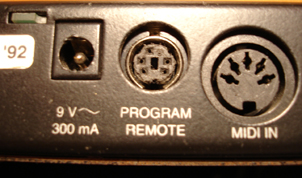
After the breaking off pin 1, the keyboard plug should fit in the "PROGRAM REMOTE" socket.
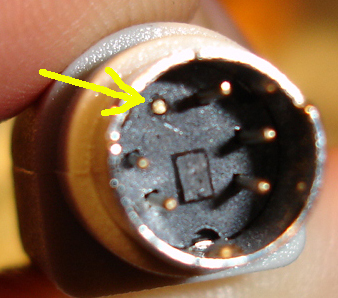
The keyboard cable plug after breaking off pin 1
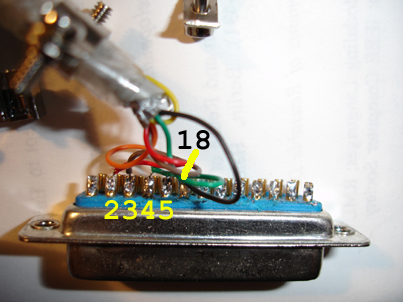
The parallel port plug after soldering the keyboard extension cable to it (numbers indicating pins).
The Windows software can be downloaded (340K zipped) and comes with 5 files:
It's probably the easiest to throw these files together into one directory.
Just for getting an idea how it looks, here are the command line (50K zipped) and GUI (270K zipped) versions for OS X.
After connecting the cable and extracting the pmc10programmer.zip open the folder named "pmc10programmer" and double click pmc10programmerGui.exe. This will start the GUI:

Since building the cable is error-prone, I recommend testing the keys by clicking them on the programmer photo, e.g. the sequence  ,
,  ,
, 
will enter edit mode and return to performance mode.
Here's an entire sequence you can perform to compare with your results (please backup your PMC10 settings since this sequence will erase everything on the PMC10):
Once you trust your cable, you can use the "compound" commands. These perform sequences of button presses to navigate within the configuration software of the pmc10. I have only implemented those parts that the Raymond software can't do because the PMC10 doesn't support them via MIDI:
Should you prefer using the command line, here are some examples.
Example call:
E:\tmp\pmc10programmer> pmc10programmer.exe menu menu menu menu menu enter
This will cycle around the top level menus and then return to performance mode.
But the program offers "compound" commands as well, e.g. to perform a midi dump:
E:\tmp\pmc10programmer> pmc10programmer.exe MIDIDATADUMPCOMPLETE
This will reset your pedal to factory defaults (please back up before testing!):
E:\tmp\pmc10programmer> pmc10programmer.exe RESETCOMPLETE
This will set your pedal's MIDI Channel to 12:
E:\tmp\pmc10programmer> pmc10programmer.exe r PMC10CHANNEL 1 2
I stopped further development since after configuring the PMC10 Channel I finally can use Raymond! I reduced the GUI to the few functions that cannot be performed with Raymond (readme) since the PMC10 doesn't allow setting these via MIDI.
Maybe I can talk Sean into integrating these buttons into Raymond. Then I only need to run one program to control the PMC10...
A simpler, self-contained arduino solution. Undocumented so far, unfortunately.
